Frequently Asked Questions (FAQs)
- Implementation
- Technology
- How to use user credentials
- Help guide to add teacher id as admin of a CLIx course Unit
- Roll-out processes, SoPs
- Platform guide
- Student dashboard, points, notes, gallery
- Best practices to start CLIx roll-out in the ICT lab
- More about User Credentials
- N-computing setup related
- N-computing issues and solutions
- Issue: Cannot connect to Host
- Extra / Further References beyond basic setup required for rollout (Optional Section)
- Steps to Download Complete Platform Data (Installer Disks)
- Steps to Download Complete Platform Data (Pen Drives/HDD)
- Data syncing process to Central server using syncthing
- Methods of collection of Thin data
- Steps for the Implementation team to follow
- How to check data sync progress on clixserver dashboard Syncthing
- Teacher Professional Development
Implementation
Technology
Help Guide for Basic Lab Issues
Question: If you get QBank Error [Error with the RED BOX with some information] .

Possible Solution: Following are the steps that we have to follow to resolve the RED Box issue
-
Open another tab and type “ http://clixserver:8080 ” in address bar
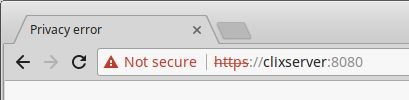
-
Page with content “ Your connection is not secure ” will be displayed.
Now click on “ADVANCED”
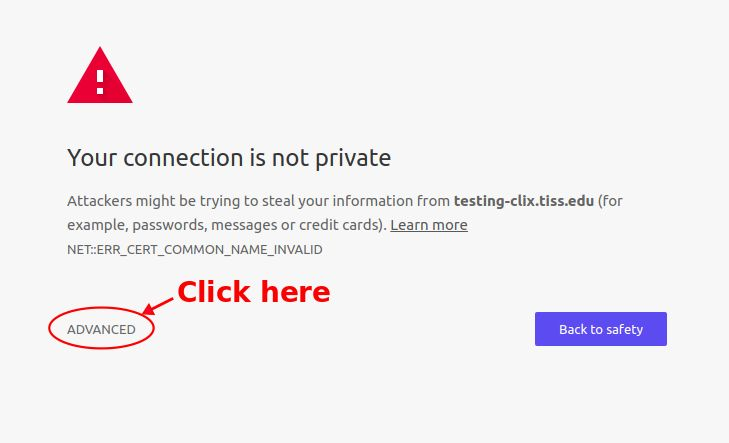
-
Click on “Proceed to clixserver(unsafe)”

In firefox you may have to click on “ Confirm Security Exception”
-
You will see a message as “Trying to GET:”, now go back to previous tab, where you got the error and just refresh the page by using key combination as “ Ctrl + R ”. You will get the page contents, and error will not be visible.

Question: If you type “clixserver” in the browser's address bar, and its not working (Web page not getting displayed)
Possible Solution: To solve this, we need to do multiple checks.
-
Type the following ip address https://192.168.1.100 or https://192.168.0.100 in the browser’s address bar, and this should show the page.
-
If the above steps doesn’t show the page then check for the LAN cable connected to the client machine and is working (eg. showing lights at connector)
-
Check if the LAN cable connected to the CLIx server machine and is working (eg. showing light at connector)
-
Check if the switch through which clients and server machines got connected is power ON and LAN cables attached to it are proper and working.
-
If step 1 shows the CLIx page on the browser, then add “Host” entry in the client machines hosts configuration file.
-
Host files path=>
-
Windows: “ C:\Windows\System32\Drivers\etc\hosts ”
-
Linux (Debian based distro): “/etc/hosts”
-
Sample entry: (server_ip clixserver)
-
Example: 192.168.1.100 clixserver
Question: The website page not getting properly displayed/ getting distorted
Possible Solution: Clear the cache of the browser in which we are getting issue using “ CTRL + SHIFT + R ” key combination.
Question: How to access platform helps.
Solution: On the welcome page you can find “Help” tab on the upper right menu on the blue line. Click on “Help” tab.
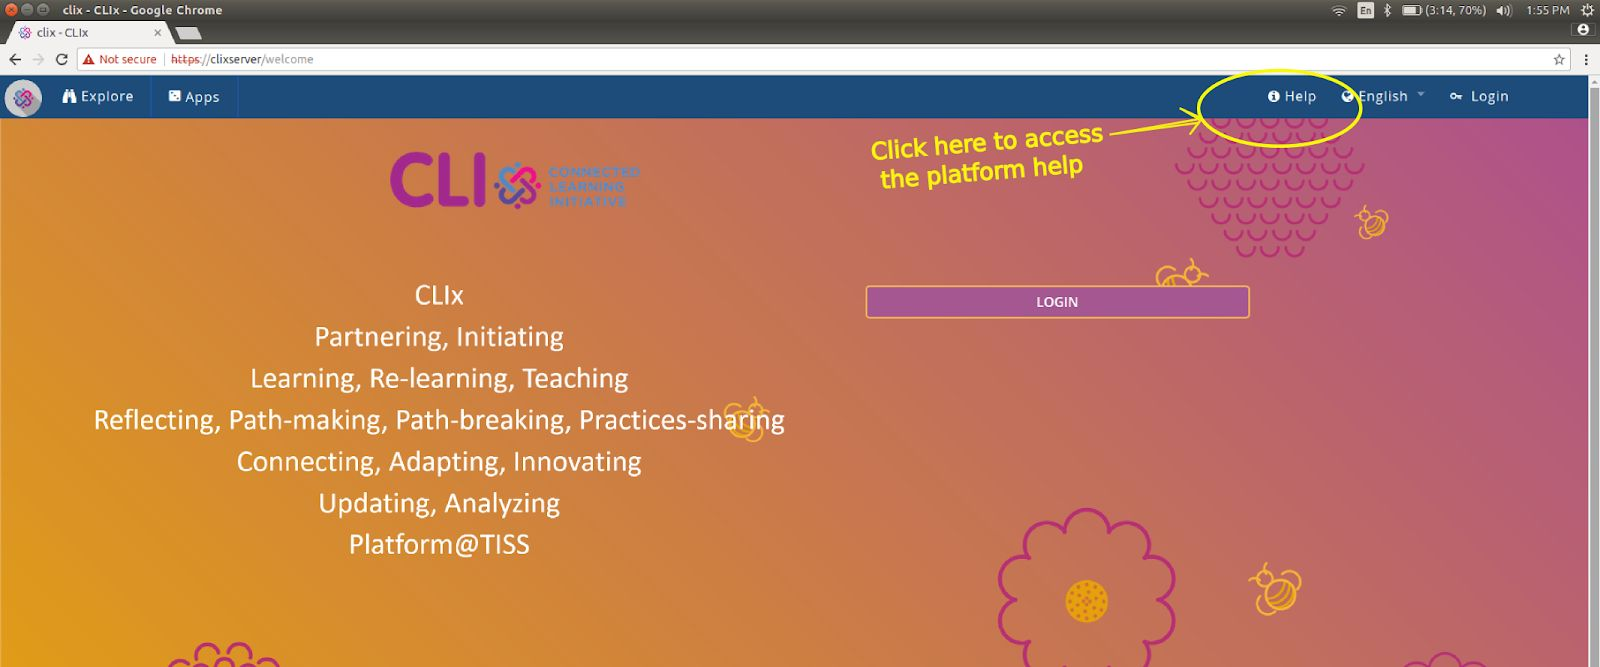
You will see the following page, click on “Help Topics” and go through the contents to find required platform help.

Question: If Server machine is beeping or Client machine is not starting
Possible Solution: There can be multiple reasons for non-working of machine. But following are the checks we can do as a primary
diagnostics for making it work.
-
Check the power cable attached to machines
-
Check once RAM, remove the system ram, clean it, insert it back to the same slot.


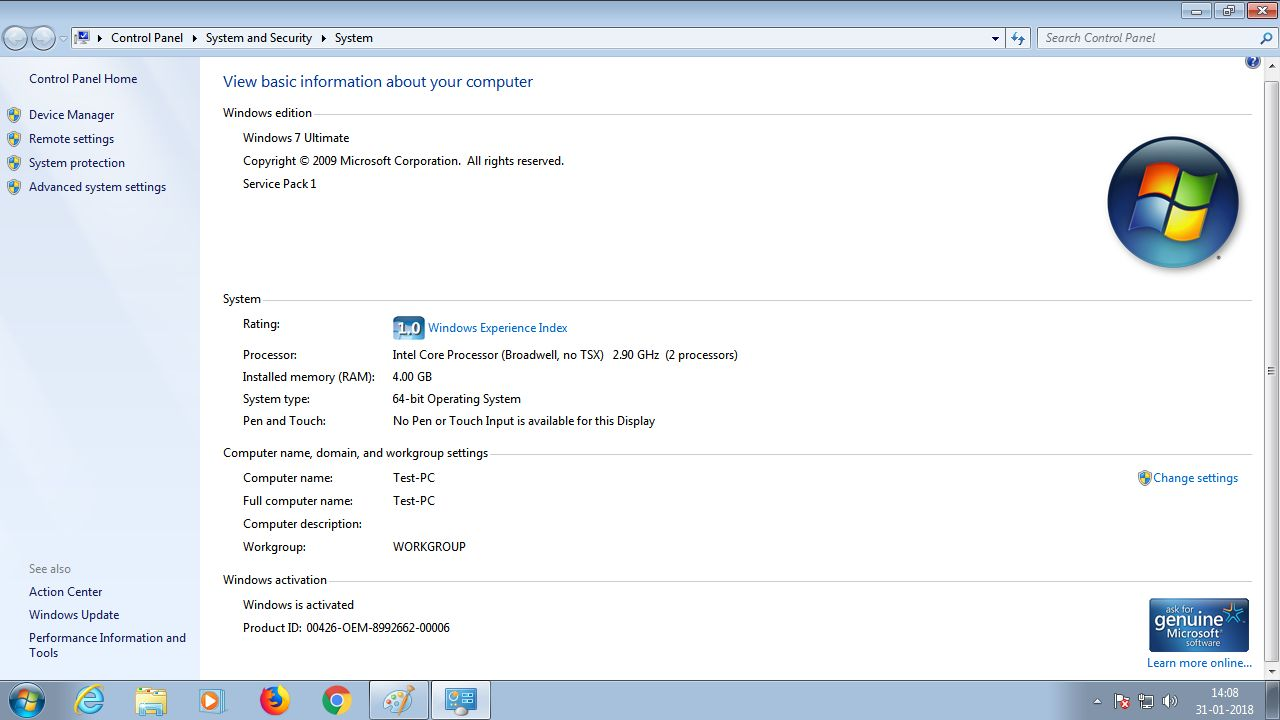
Question: How to get the windows system details/information about operating system, RAM etc.
Solution:
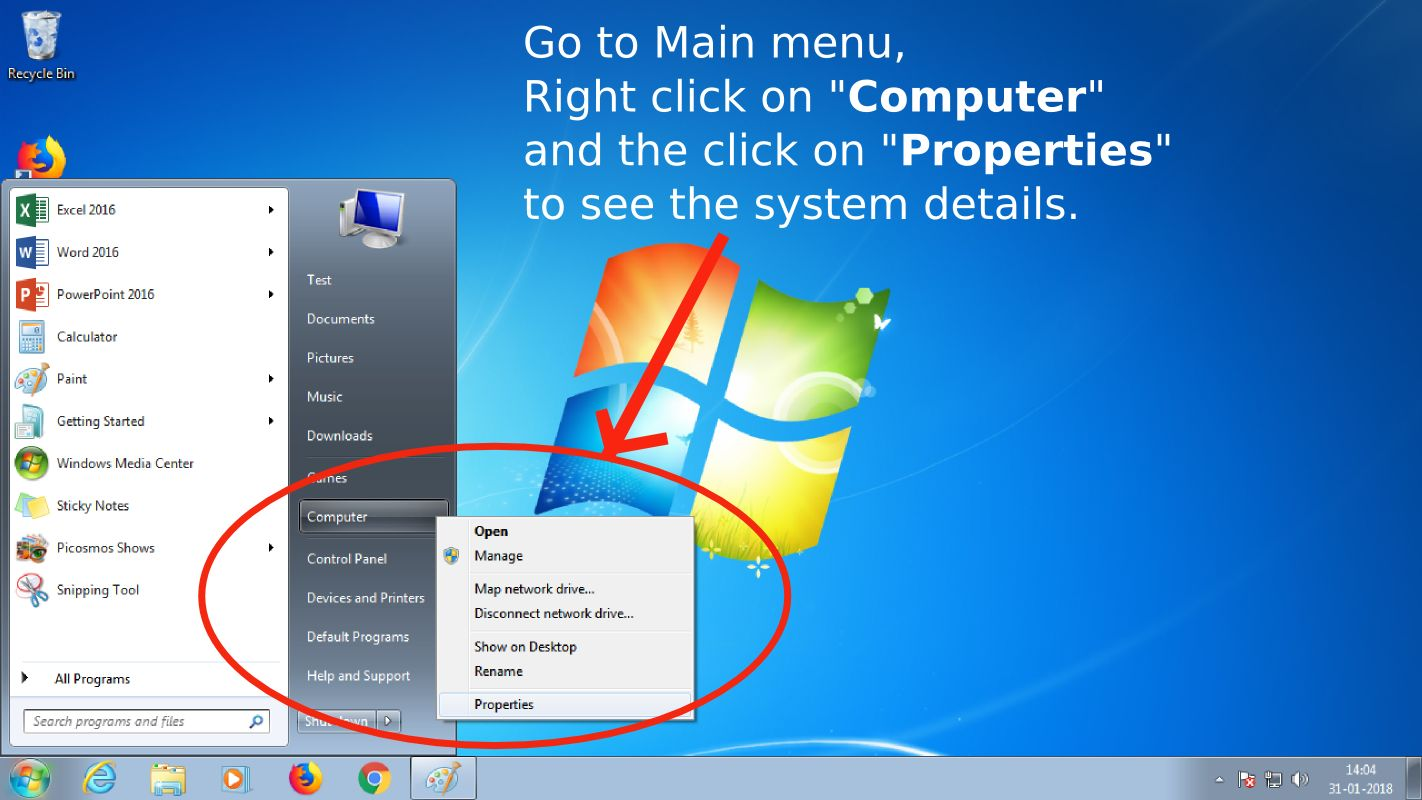
You will see basic information about your computer on page like the following:
Best practices to start CLIx roll-out in the ICT lab:
Extra / Further References beyond basic setup required for rollout (Optional Section):
-
User CSVs: h
How to use user credentials
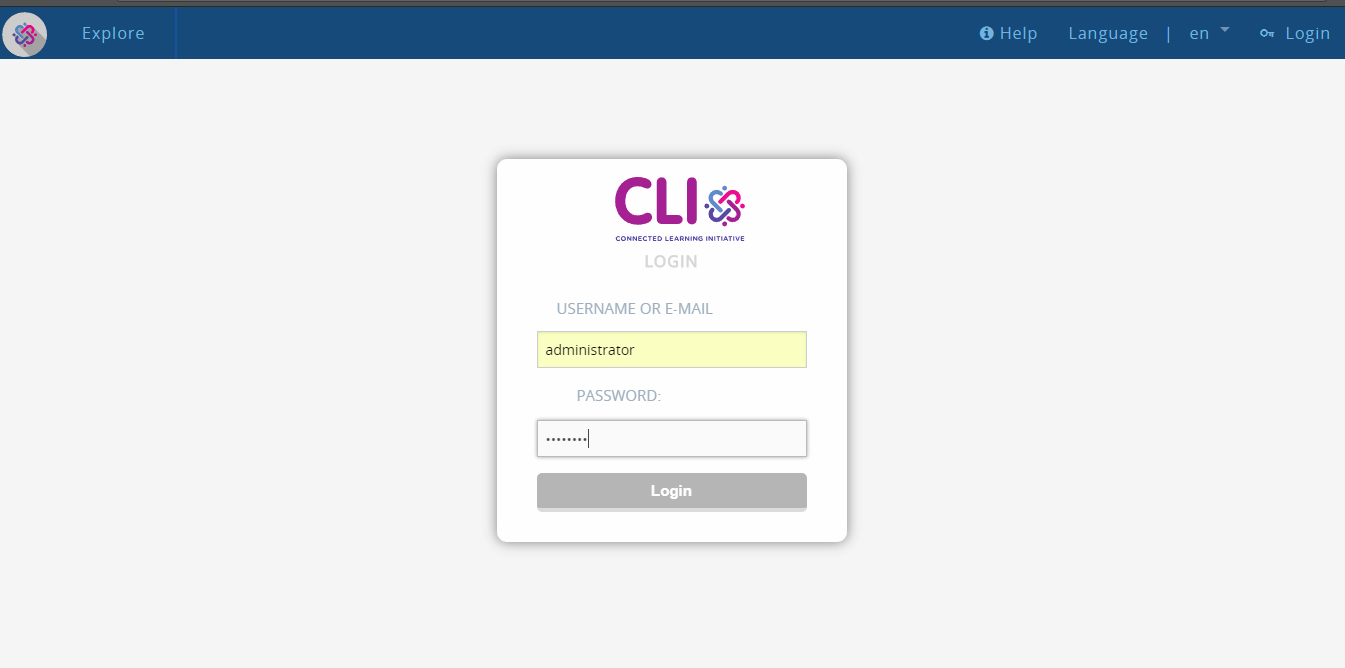
Open Google Chrome and enter in the Address bar CLIx offline web address:https://clixserver.tiss.edu
We entered the CLIx page then click on login.
Here we see the CLIx login page
In the CLIx login page, we have to see two boxes, 1 is CLIx Username box & 2nd is password box.
Already the CLIx team has given all schools Usernames and passwords files.
In these file total, 1050 Usernames & passwords are present with 1-50 Usernames & Passwords for teachers, 51 -1050 Usernames & passwords for students
Example for Student Usernames:
color-animal/fruit/flower/birds/insects-school server-id
black-ant-tg1, green-strawberry-tg150
Similar to the examples, students will have a unique combination of student Ids and passwords. Every school has a server machine, which does not have a monitor and the “clix server” is written on the CPU. Every server has a unique number as mentioned in the example
Example of Teacher Username & password:
color-element-school server-id
blue-iron-tg3, red-copper-tg130, green-silver-tg260
School staff allocates 8th & 9th students these Usernames & Passwords
Every student has a separate Username & password in 8th & 9th class
Teachers also have subject-wise usernames & passwords English-iron, Maths-copper, science-silver
Teacher ID is a combination of color-element and school server ID. Element iron is assigned for English teachers, copper for math and silver for science teachers. 5 teacher ids for each subject will be provided for each school, which means a school
will have a total of 15 teacher IDs. 5 for English(iron), 5 for math(copper) and 5 for science(silver). Teachers can use teacher IDs to see student's work, which is group analytics.
Teachers can see all i2c modules and their respective subject course analytics but not the other subject. For group analytics, you can also show the teacher help document. Every school will
have 15 ids for teachers, 5 for each subject. Please note the following combinations will be the same for all schools (blue-iron,green-iron,orange-iron, red-iron,
yellow-iron: English teachers, similarly blue-copper,
orange-copper, red-copper, yellow-copper: Math), however, the only difference would be it will have a unique school server-id.
There are just five colors and 3 elements. After the Student login in case 1 system for 2 or 3 students sitting 2nd, 3rd student need to login via buddy login.
On the CLIx page after login with ID & password we have to login buddy so go to top left here show + button, click that button then display colors & 2nd word of Username(animals, fruit, flower, etc.,). Students add their ID.
Then go to explore here all subject modules are then Goto any subject module then display units, goto unit then display lessons, In every unit, we have pre-test & post-test are their.
Every lesson sub lessons are present. In every lesson, there are subject contents displayed as a text, audio, video, exam test wise.
------------------------------------
Help guide to add teacher id as admin of a CLIx course Unit
This guide explains how to make a teacher admin of a CLIx course unit. Once CLIx platform is installed on a school server, teachers and students need to be allotted unique user ids. Students will have user ids bearing animals, fruits and flowers such as blue-parrot, green-apple whereas teachers will have user ids bearing chemical elements such as blue-carbon, red-iron.
A list of one thousand such student & teacher user ids and passwords (technically referred to as user id CSV) will be part of the installer disc.
CLIx Field Technologists/Field Professionals need to take print out of user id-password list and,
-
Work with teachers to assign the user ids to students and teachers and write down student’s details against their user id
-
Keep the register in the school lab and ask the teachers to maintain it
-
Keep atleast one backup of the register in HM/Principal’s office
-
If feasible, paste the user id-password list on the wall of computer lab
Additionally, CLIx FTs/FSPs will have super admin access to the platform server (user id: administrator; password: changeit). It is important that these credentials are NOT shared with anyone else outside CLIx field team.
Making teacher user id as admin of a course unit:
Before the roll-out session, teacher user ids need to be made admin of their corresponding course units. For example Math teachers should be addded as admin in Math modules and Science teachers be added as admin in science modules. By making teachers admin of a course unit, teacher user ids will have few special privileges as compared to student user ids: That is teachers will be able to moderate (edit/delete)
-
student comments
-
notebook notes
-
file uploads in the gallery, and
-
be able to see Group Analytics (progress report of all students enrolled on the course unit).
Tip:
-
For convenience, we can fix subject-wise teacher user ids such as English teachers to get iron; Math teachers to get copper; Science teachers to get silver etc. However there is flexibility to choose.
-
Multiple teacher ids can be added a Admins of a course unit
Please follow below steps to add a teacher as admin of a course unit:
Step 1: Login as administrator
Step 2: Go to Explore
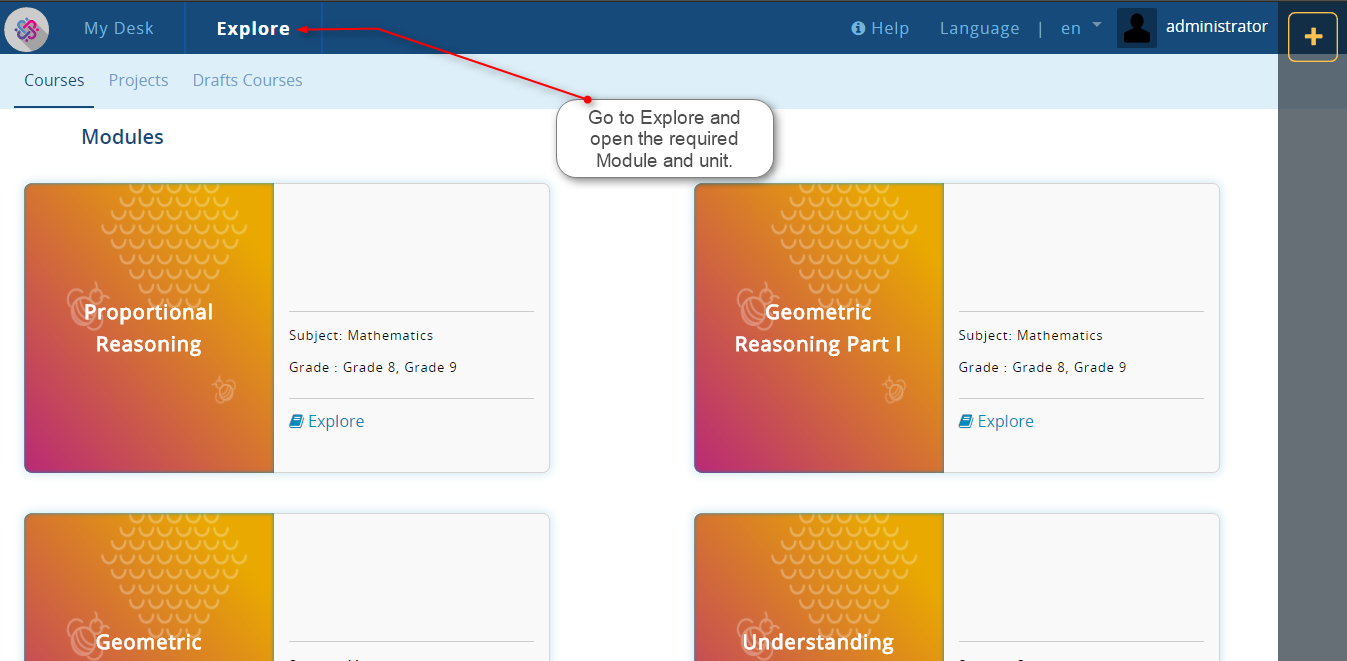
Step 3: Open the Module and Unit. Please note, teachers need to be added as admin at the Unit level. If a module has five units (for example Proportional Reasoning) teachers need to be added as admin in all the five units.

Step 4: Click on the settings button and choose Manage Users

Step 5: Search for the user id that you want to admin and add it as Admin (if there are multiple teachers then search and add them as Admin one after the other).


Step 6: Logout of the platform as administrator or open a new window in Chrome incognito mode.
Step 7: Login as the teacher user id that you added as admin of course units
Step 8: Go to the course unit and see if the GROUP ANALYTICS tab is visible in the overview. If the tab is visible then the teacher is now admin of the group.
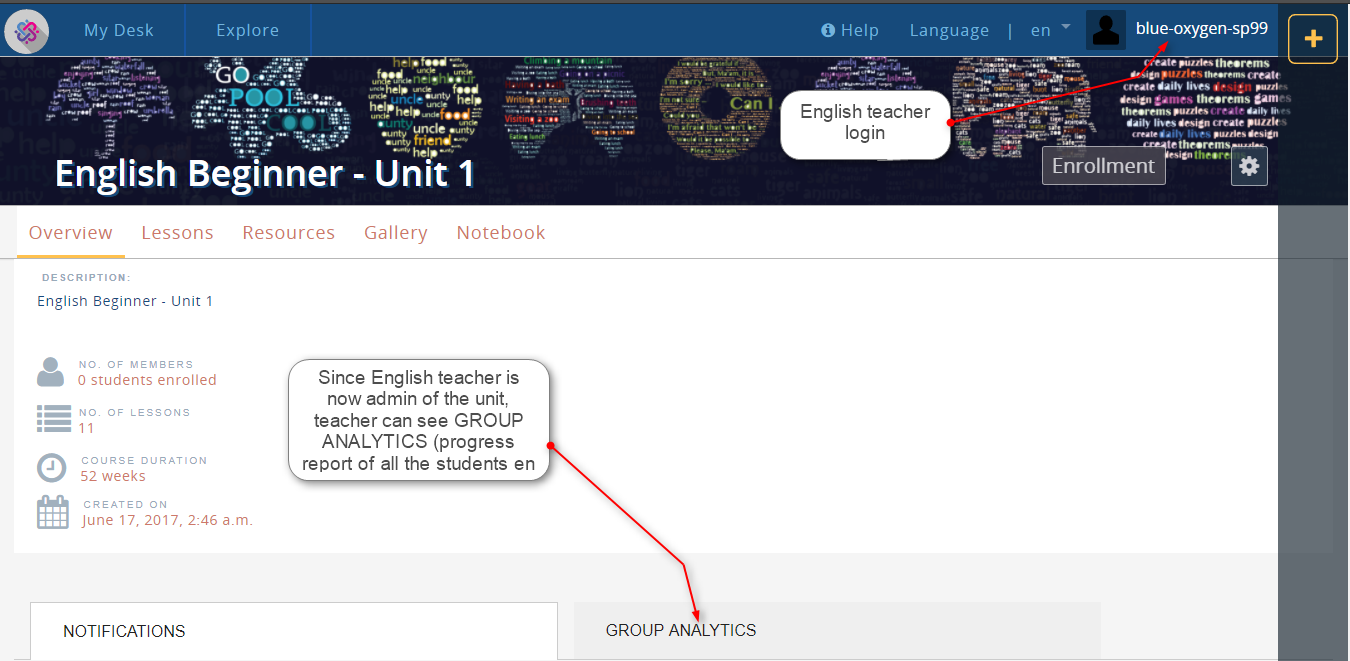
Step 9: If the tab in course unit Overview is PROGRESS REPORT then the teacher id is not an admin of the course unit.

Roll-out processes, SoPs
First Day of Clix Rollout:
1) Take a small demo class of usernames and passwords and how to explore modules through the Projector(K-yan projector).
In that, explain Teacher Usernames (i.e color-element names-server code) in our school we have four subjects that's the way we are using three elements, example Iron for English Teacher, Copper for Maths Teachers and Silver for Science Teachers(Physical and Bio science). Each element has five usernames, so we can use these username as per subject ratio, in that total 50 teacher usernames available.
2) Teacher and Student passwords contain 6 characters, all lower case.
3) Explain Students Usernames and password i.e Usernames (i.e Color-animal names/fruit name/flower name- school server code).
Example:
Teacher Usernames
blue-iron-tg200 Password ixwrtj green-iron-tg200 Password uifhyj
yellow-copper-tg200 password aevgfh
Student Usernames
black-ant-tg200 Password ibhzal
blue-cheetah-tg200 Password treomn
4)After explaining how to explore modules, first you restart the projector.
5) After that go to desktop, click on Google Chrome icon in that address bar you can type https://clixserver.tiss.edu after click on Enter, Its open Clix home page.
In this page you click on the Login option, it will show username and password page, so you can type your username and password after click on the login button, it will open My desk page here show your username in big letters, you can edit your details in Edit Profile i.e First Name and Last Name, Roll No, Grade/class and School Name after enter your details click on the Save button, your details will be appeared on My Desk Page under your ID.This helps the teacher to identify the student ID.
* If the details have not been edited in the Edit profile, they will not appear on the Progress Report. So, please edit your profile.
6) After Student login incase 1 system for 2 or 3(1:3) students are sitting that time main login can add other two students via Add Buddy, so click on “+” (Plus) symbol on the right side top of the page, its open one Pop Box in that will select first color after selecting one animal/flowers/fruit name after you click on the Add button, these usernames appears on the right side of My Desk Page.
7) You Click on Explore option, it will show all Subject Modules here after that you select one module in this page, it will be shown all Units after that you select one unit in that unit show options i.e. Lessons, Resources, Gallery, e-notes, Progress.
8) You can click on Lesson Option, it will show all Lessons in that unit and you can click on “ + “ (Plus) Symbol or Lesson Names it will elaborate subtopics in this lesson.
9) You can read text and attempt Pre-test or Assessment, Images, Videos in this lesson. What have observed and what have learned in this lesson, you can write e-notes in e-notes option.
10) You can click on the e-notes option , it will show New note, All notes and My notes. If you click on the New note option, a box containing “Title” and “Description” will be opened. You can write a topic name in the Title Option and description about the topic in the description box.
In the Description box, you have to edit the text format and use all options in Description Box.After that click on the Save button, it creates a note in My Notes. These notes will appear in All notes option in e-notes and also in teachers login.
Anyone can write Feedback for the E-notes.
Students will reply to others E-notes.
11) You can upload Screenshot Images, Images, PDF file, Videos and Text files in Gallery Option, it will appear in all users and also Teacher login. And also write feedback on Gallery.
12) After you can check your progress in Progress option, it will show Total score in that particular Unit.
13) After completion of the period, you must Logout in this module. To do that, click the logout option. Top right side of the page under user name.
After Completion of Demo class
14) Will distribute the username and password to Students as per Roll No.
After Entering the Computer Lab Switch on all Power switches, once explain the Lab Structure i.e One Clix Server, 2-Client Cpus(Ncomputing servers, and 10 Monitors with keyboards and Mouses , Ncomputing Devices, the Client CPU have connected 3 0r 4 Ncomputing Terminals with Dummy Cpu(Ncomputing Devices).
Clix server has Ubuntu Operating systems, other two Client Cpu’s have Windows XP and Windows 7 Operating Systems.
Clix Server has connected with 2- Client Cpus through the D-Link Switch.
When you explore the modules that time you should ON Clix server and D-Link Switch.
Two or Three Students are sitting in front of One Computer, First Switch on Clix Server Cpu it take time to open one or two minutes after it show “core” username on Screen, so click on “Core” username , it appears password Box, so you can type password: 77ck77ck(lower case)
Other Two Client Cpus, One Client Cpu has connected 3 or 4 Ncomputing Terminals, so first Switch on Client Cpus(Admin) it will start and open all Ncomputing Terminals(Users 1,2,3,4), it show one pop box on desktop in that appear username and password, so don’t change usernames, you can click on the OK button, it appear Desktop.
In that Desktop Open Google chrome and enter in the Address bar CLIx offline web address : https://clixserver.tiss.edu
In this page, click on the Login option, it will show username and password page, so you can type your username and password after clicking on the login button.
Platform guide
- The difference between teachers and students credentials
A Teacher login Credential starts with a Colour name followed by an Element such as Copper,Iron etc, whereas a Student login Credential starts with a colour name followed by name of either of Animal/Bird/Fruit.
- Buddy login
A Buddy is another student who shares the computer with one or more other buddies during CLIx class.
Buddies learn together.
Buddies help each other and work with each other during a CLIx class.
Buddies can be added or removed during a CLIx session as per the teacher’s guidance
How to add a buddy?
- Click on the '+' button on the Right Hand Side (RHS) blue bar.
- Select the buddy by choosing the name and colour
- Click on 'Add' button after selecting the buddy, the buddy will be added.
Student dashboard, points, notes, gallery
Dashboard or My Desk : My Desk is the place where students start after logging in to the CLIx platform.
In My Desk, My Courses and My Performance are displayed.
My Courses displays all the In-Progress and Completed CLIx units of a student.
The Units which students have Enrolled into are displayed in My Courses.
My Performance shows the following details about the student's work on the CLIx platform:
Progress of the enrolled units, lessons, assessments, file uploads, interactions, note making and total points earned.
That is, My Performance is an aggregated summary of how an individual student is progressing in the CLIx learning journey.
Points:
Points are given for your learning progress. Below are some of the ways in which you can gain more and more points:
1. Enrol into a unit
2. Complete all the lessons and activities
3. Take assessments & quiz
4. Make notes
5. Discuss on the notes created by other students
6. Upload files in the gallery
7. Make use of Resources
8. If others give you ratings (stars)
Notes or Notebook:
Notes or Notebooks allow teachers and students to post their notes, see others’ notes and discuss with each other by reply option.
Gallery:
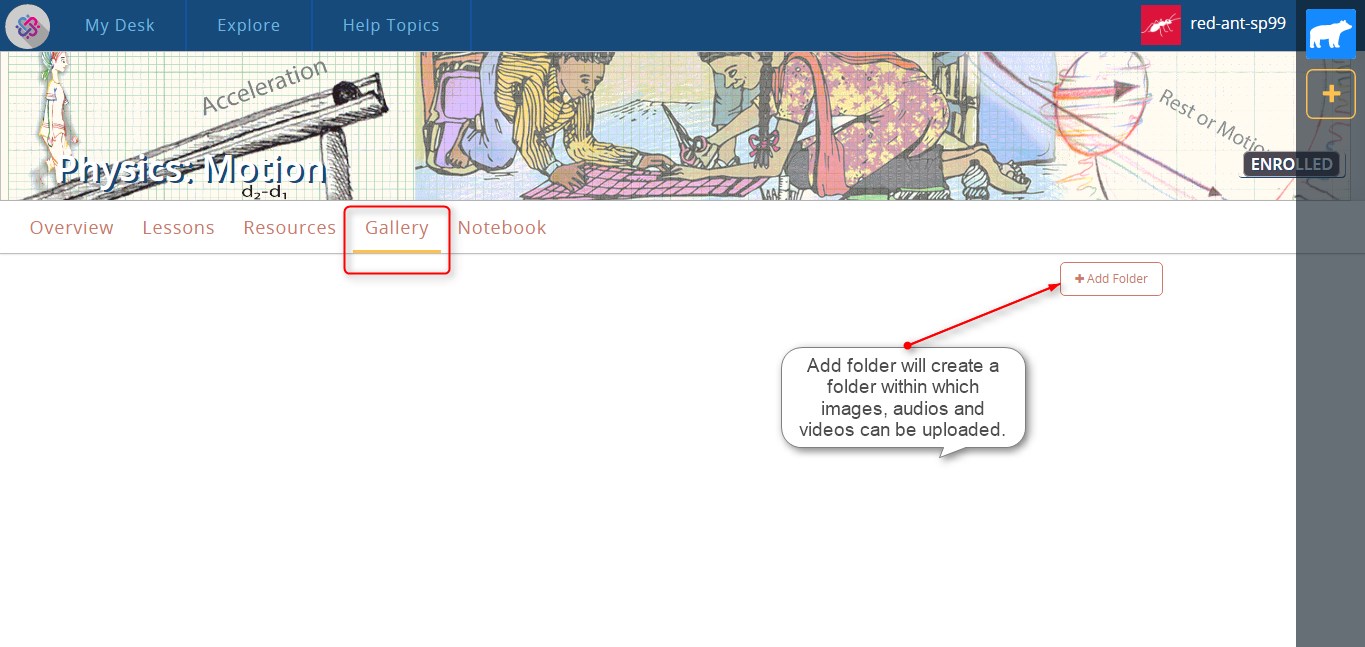
Gallery allows file upload in an organized way. In order to upload files, first a folder needs to be created. Within the folder files can added as below:
1. Go to the gallery.
2. Click on the Add button.
3. Enter the name of folder and briefly describe what kind of files this folder will contain.
5. Save the folder.
6. Once the page is refreshed and the folder is generated, click on the folder.
7. Click on the Add File button.
8. Enter file name.
9. Enter description (if any).
10. Choose a file by pressing on ‘Select File’
11. Click on the ‘Upload’ button, the file will be saved.
12. You can add alternate files using the Link Related File.
-
Teachers
- Teachers dashboard
Teacher Page is the activity level help page available for the teachers.
Any specific instructions related to that particular activity will be provided for teachers on the teacher page.
A teacher has access to some additional features than the students:
1. View all students’ progress reports in Group Analytics
2. View teacher help page in an activity
3. Edit and delete students’ notes
4. Edit and delete comments made by students
5. Upload files in Resources & Gallery
6. Delete file uploads by students in the Gallery
Best practices to start CLIx roll-out in the ICT lab
In the CLIx rollout session which takes place in the ICT labs using CLIx platform offerings through computers, there are a number of activities that need to be by students, at the beginning of the session, on a daily basis, so these are important and should be considered as a first session of the rollout, so that the second session onwards students will focus on actual learning activities and these daily activities becomes smoother to them.
Below listed are those activities along with their requirements and how to’s:
- Starting the computers and login into the machine (if password enabled login)
- Once the students enter the classroom for the session, the first thing they need to do is to start the computer which they will be using to interact with the platform and use it for learning
- After starting their respective computer, if the computers are password enabled for logging in, they need to put the credentials and logging into the computer
- They should also make sure that the server machine and switch/Wifi router, through which all the machines are connected in the network are up and running
- Accessing the platform
- Once they complete step 1 above, they need to open the “Browser” application (Chrome Recommended if not available Firefox can be used) installed on their computer
- In the browser’s URL, they have to put “clixserver.tiss.edu” as the CLIx platform’s address and access the platform
- Login into CLIx Platform (Usage of Username and Password)
- Before going for the first session, each student must have got the username and password to be used to logging into the platform, which is provided to the school when the platform got installed, as per the school Id got assigned by the CLIx team
- The usernames are the combinations of “Color + Animal/Fruits/Flower Names + School Code”, so as to keep the privacy of the students intact and let them perform without any burden, and also to understand the importance of privacy as one of the important skills of the 21st century, and passwords are randomly generated by machines against each of the username
- After completing step 2, students should log in into the CLIx platform, mainly due to the following reasons:
- They should understand the practice, process, and the importance of having credentials, log in using the same, which is while using the internet in current and future time.
- The students who log in to the platform and do any kind of activities during the learning process over the platform, platform do assign points against each of those activities for those logged-in users only.
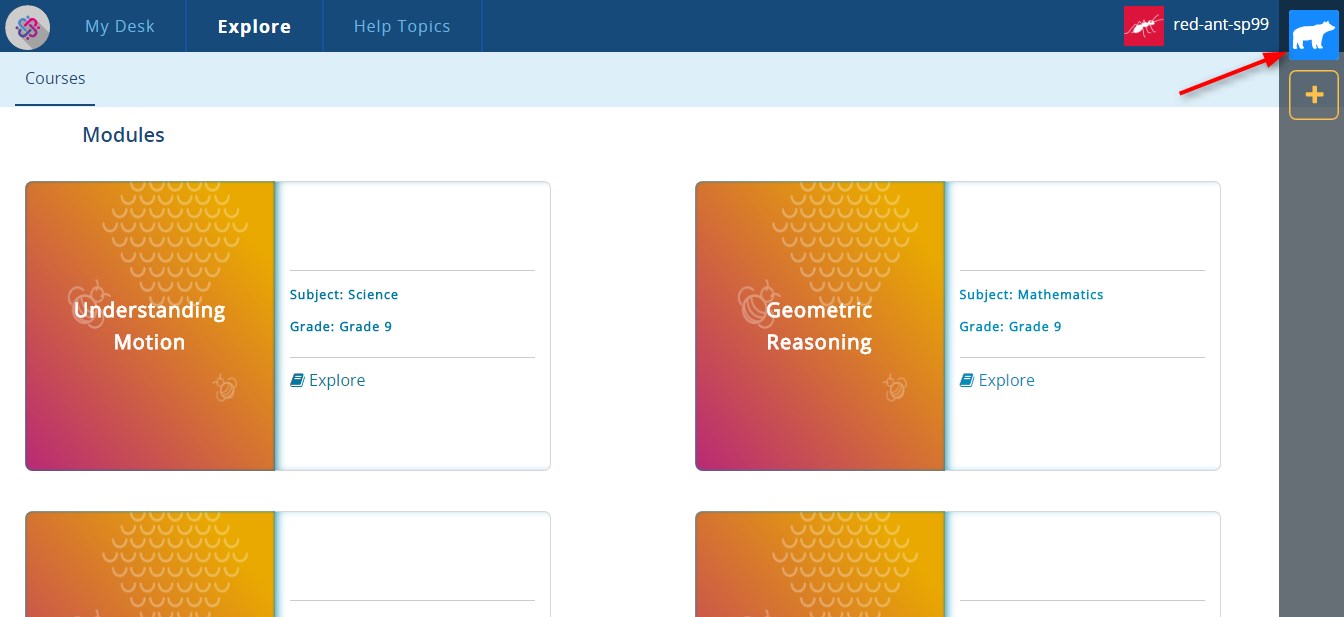
- Adding Buddy
- In the schools, we have fewer computers, space than the number of students in a classroom. To overcome this constraint up to a certain extent, the platform has a feature where more than one student (if space allows) can seat on the computer
- After the first student logs in to the platform in step 3, he/she need to tell the platform about other students who are seating and sharing the same computer, by adding those students as his/her buddies
- Once all the other students seating with the first student who did primary login gets added as buddies, platform assigns an equal number of points as it does for the student account who logged in with primary login
- This is the second important step after logging in by one of the students as if it doesn’t take place other students will not get any points against their activities though they were present in the session and did the activities.
- Explore Button usage
- Lesson contents and course player
- Notebook writing, ratings, and feedback to others note
- Replying to our own notebook’s feedback
- Viewing the progress report and points gained for all the interactive activities
More about User Credentials
- The process to create new user credentials
- School Code, State Code, District Code details
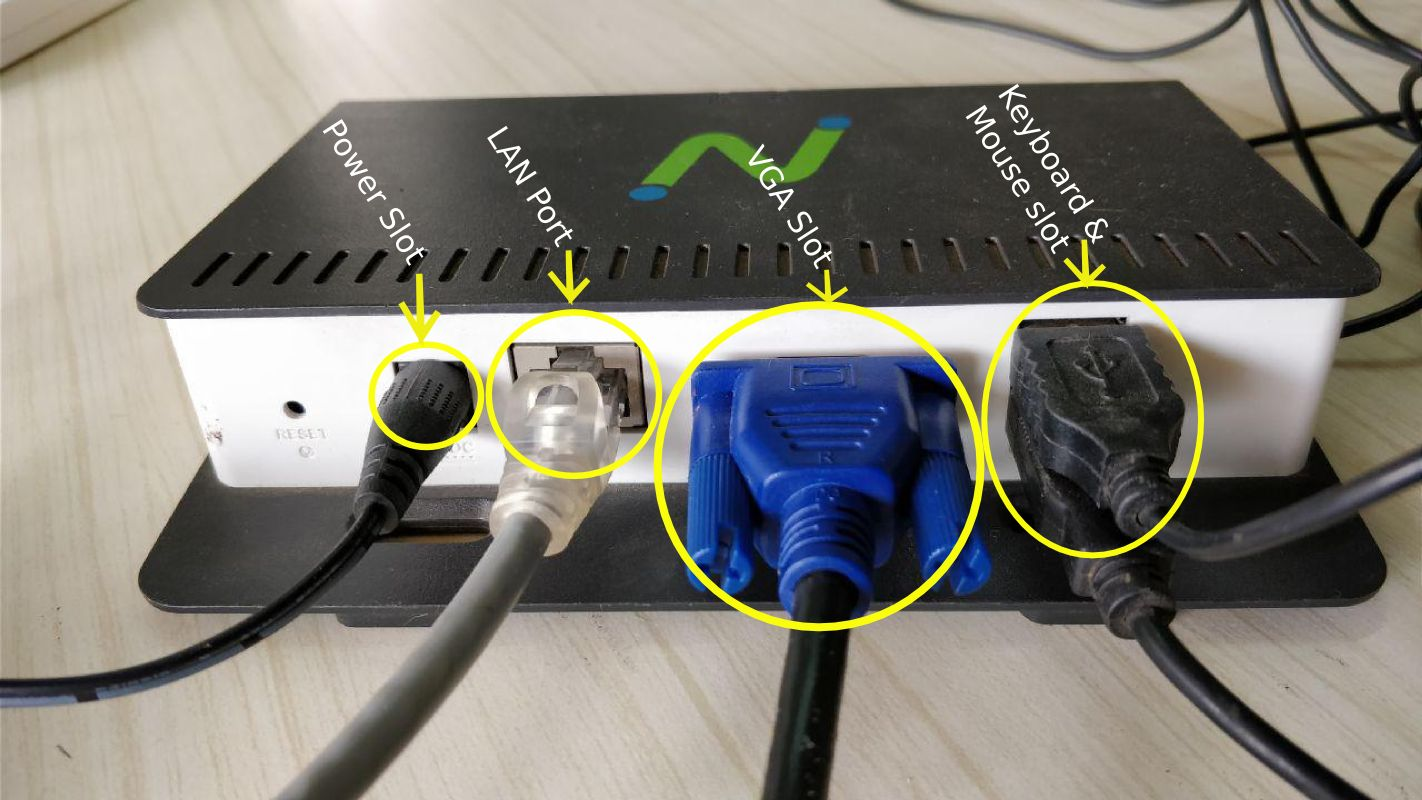
N-computing setup related
-
NComputing ports information:

-
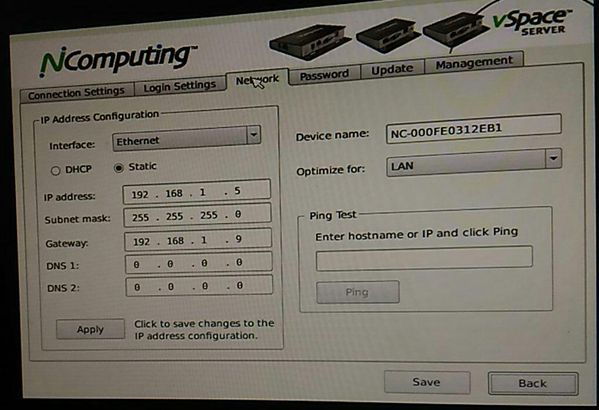
How to Assign a Static IP Address in M300 N-computing Device
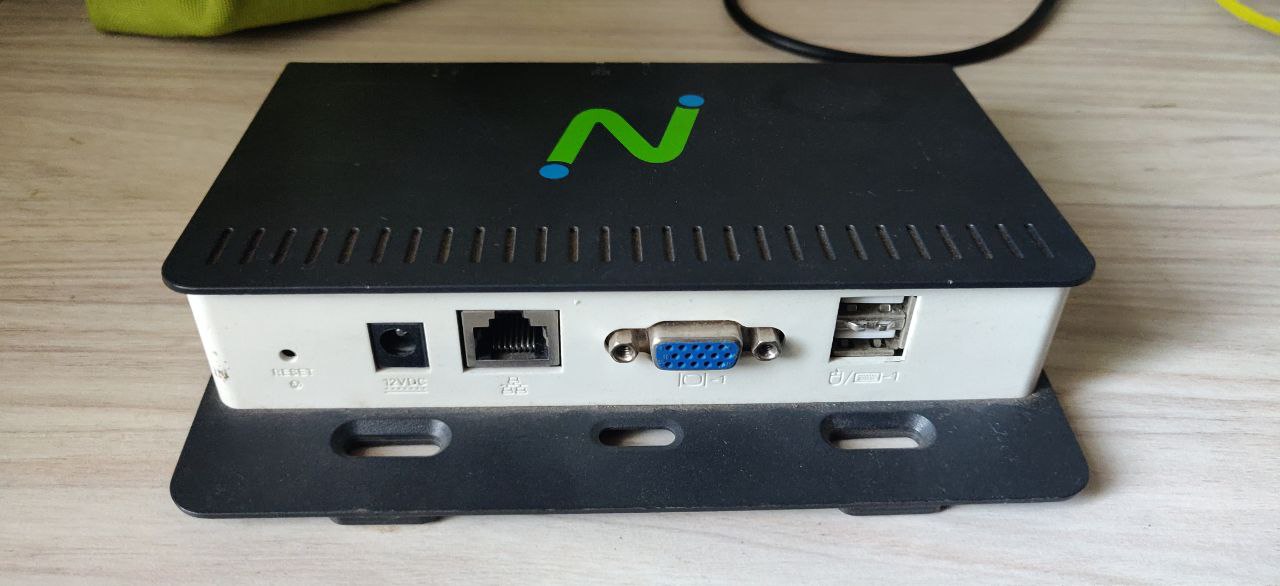
After installing the vSpace server at the host PC or Server, it is important to set up
The n-Computing device, after connecting the device, please turn on the device (M300 have 3 devices please configuration on the main device which size is bigger than 2 devices)
-
At first power on the N-computing server and N-computing device then press F5.

-
Select the ‘’ Device setup’’ option.

-
Then select the‘’ Network Setting” option.

-
Select ‘’ Static Radio button ” and insert IP (Internet protocol), Subnet mask and Gateway.
Ex. – The IP address 192.168.1.4, subnet mask 255.255.255.0, Gateway 192.168.1.14.

-
After filling all the blocks of IP click on the Apply button.
-
And finally, click on the save button to save all the changes.
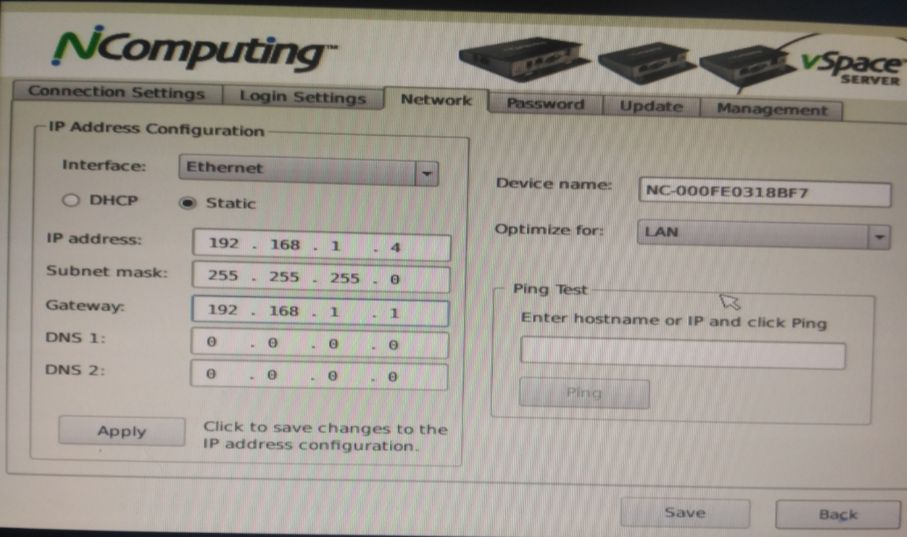
-
Now Server will show up on the home screen of the M300 N-computing setup.
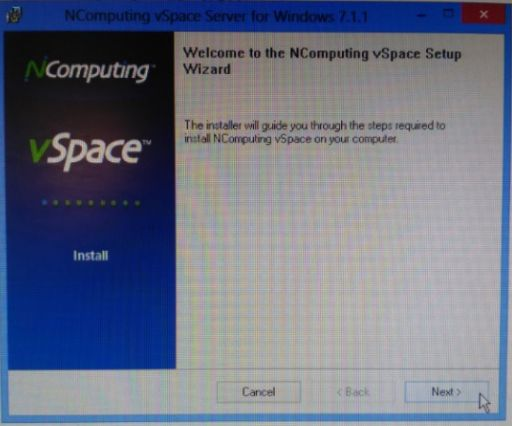
N-computing issues and solutions
-
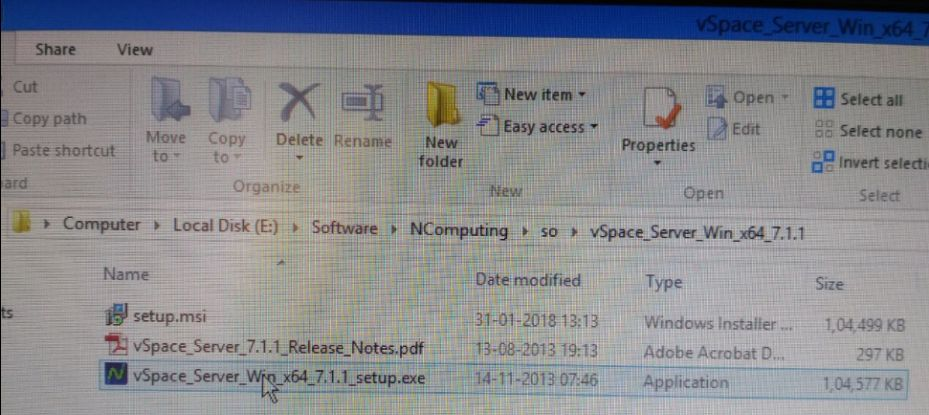
N-computing Vspace License Issue

Solution: If you face above mentioned issue please following steps:
-
You will require “vSpace-license-setup.exe” with the respective version file.
Double click on “vSpare_Server_Win_x64_-_-_setup.exe” executable file.
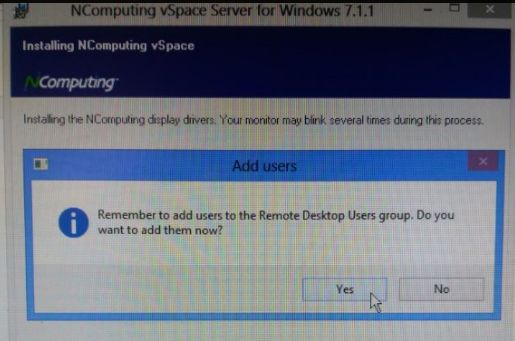
-
Click on ‘Next’
-
Again click on ‘Next’

-
Check mark on the radio button ‘I Agree’ then click ‘Next’

-
Again click on ‘Next’

-
Click on ‘Yes’.
-
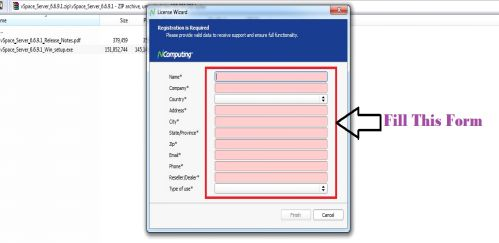
Fill this form
-
In the final step check mark on the radio button ‘Master/Slave’ after this check mark on the radio button ‘ Discover master host automatically’
And finally, click on ‘close’.

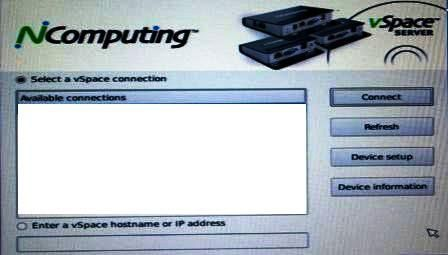
Issue: Cannot connect to Host
-
Cannot connect to Host

Solution: Vspace installed on a host machine. Vspace server delivers virtualized desktop sessions to the client devices. It works on the server for desktop virtualization.
Cannot connect to host problem arises when there is no communication between M300 device and server. It can be problem of network, Server, IP and Device setup.
-
Check whether LAN cable is connected properly or not.
-
Check IP of M300 and server IP.
M300 IP steps:
-
Click on Device set up
-
Click on Network
-
Check IP configuration.
Insert correct IP address, Subnet mask and Gateway that is in the range of High-end and Low-end server.
Note: IP address, Subnet mask and Gateway should be in the range of High-end and Low-end server.
-
Click on Apply and Save.
-
Go to control panel and Click on Network and Internet.
-
Click on Network and Sharing center and also click on Change Adapter Setting.
-
Right click on Ethernet and go to properties.
-
Double Click on Internet Protocol Version 4(TCP/IPv4)
-
Check whether IP address, Subnet mask and Gateway is correct or not. If not then make this correct.
Note: IP address, Subnet mask and Gateway should be in the range of N-computing.

-
After this click on ok and again click on ok. Close all the open windows.
-
After M300 and High-end and Low-end server IP configuration, go to Client machine and Connect to server.
It will work fine.
-
Question: Ncomputing clients are not working.
Possible Solution: We need to check for the following things:
-
Check that the power cable is attached properly and devices is powered and running
-
LAN cable to master device, Keyboard and Mouse wires to all devices are attached properly.
-
Check the time and date and set proper on NComputing server machine.
-
Restart the main NComputing machine
-
Question: After restart of NComputing server, client system not working.
Possible Solution:
-
Check time and date are correct after restart
-
In NComputing server system go to “ TRY BOX ” at bottom right find “NComputing icon” is there and “right click on it” => “NComputing console” => “Local settings” => “Stations” , goto each station and find the green icon that is to start the station click on it the station will start. Do this for every station.
-
Question: If monitor is displaying properly but unable to do typing or mouse cursor not moving
-
Possible Solution: Check for loose connection of keyboard wire, mouse wire to the machine on which its attached. Try to disconnect and reconnect in same ports or on different ports.

-
Question: Unable to hear or record from headphones attached to device.
Possible Solutions: Try following tests and confirm for correct connection
-
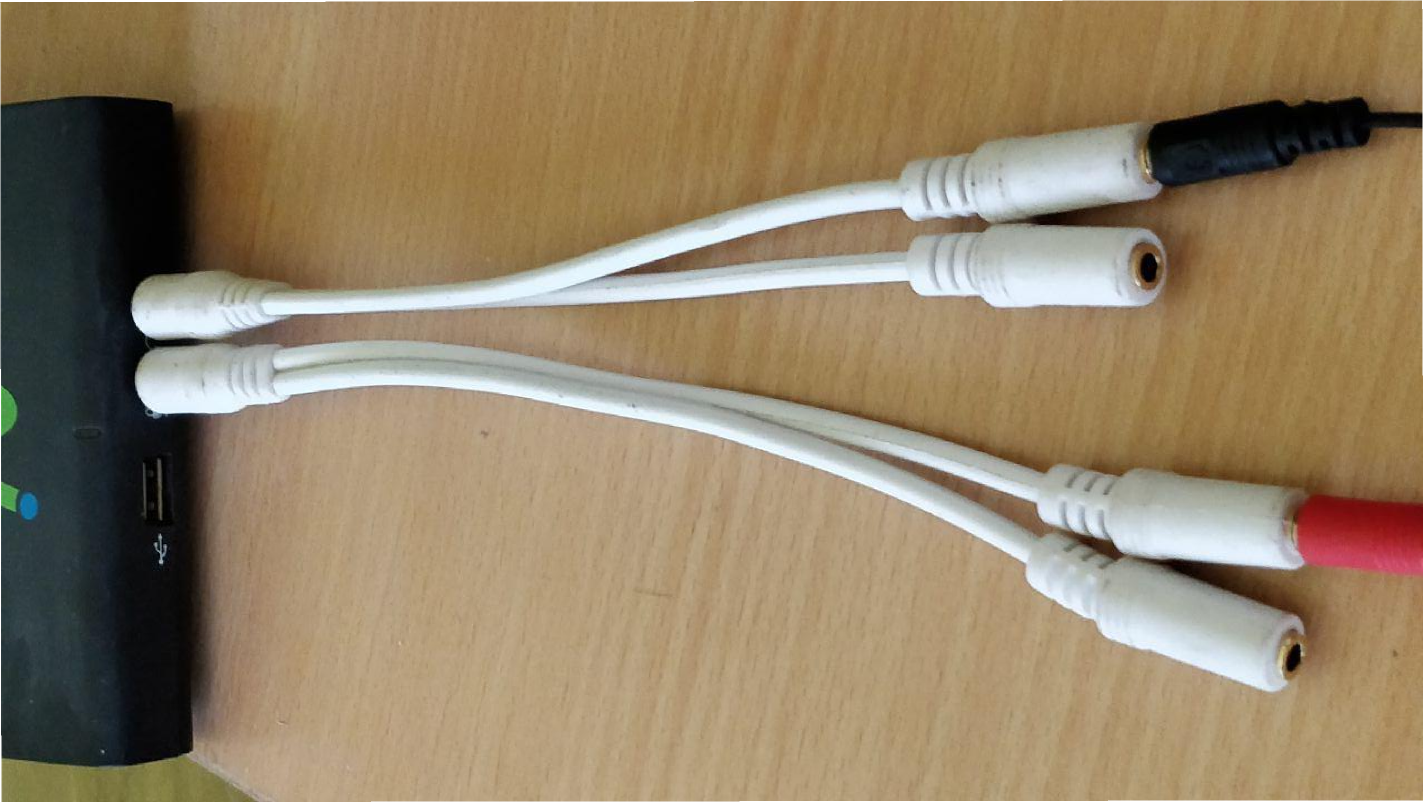
Check for the proper connection of headphone pins in the proper slot of audio out
-
Check for the proper pins connection to audio in slot
-
Reinsert and check the audio hearing and recording,
-
Check if the pop-up on the browser has been clicked while recording the sound.


8. Extra / Further References beyond basic setup required for rollout (Optional Section):
Extra / Further References beyond basic setup required for rollout (Optional Section)
- Steps to Download Complete Platform Data (Installer Disks):
- Steps to Download Complete Platform Data (Pen Drives/HDD):
- Data syncing process to Central server using syncthing:
- How to check data sync progress on clixserver dashboard
Steps to Download Complete Platform Data (Installer Disks)
-
Turn the server computer ON.
-
Press ctrl+alt+T (This command will lead you to the Linux terminal).
-
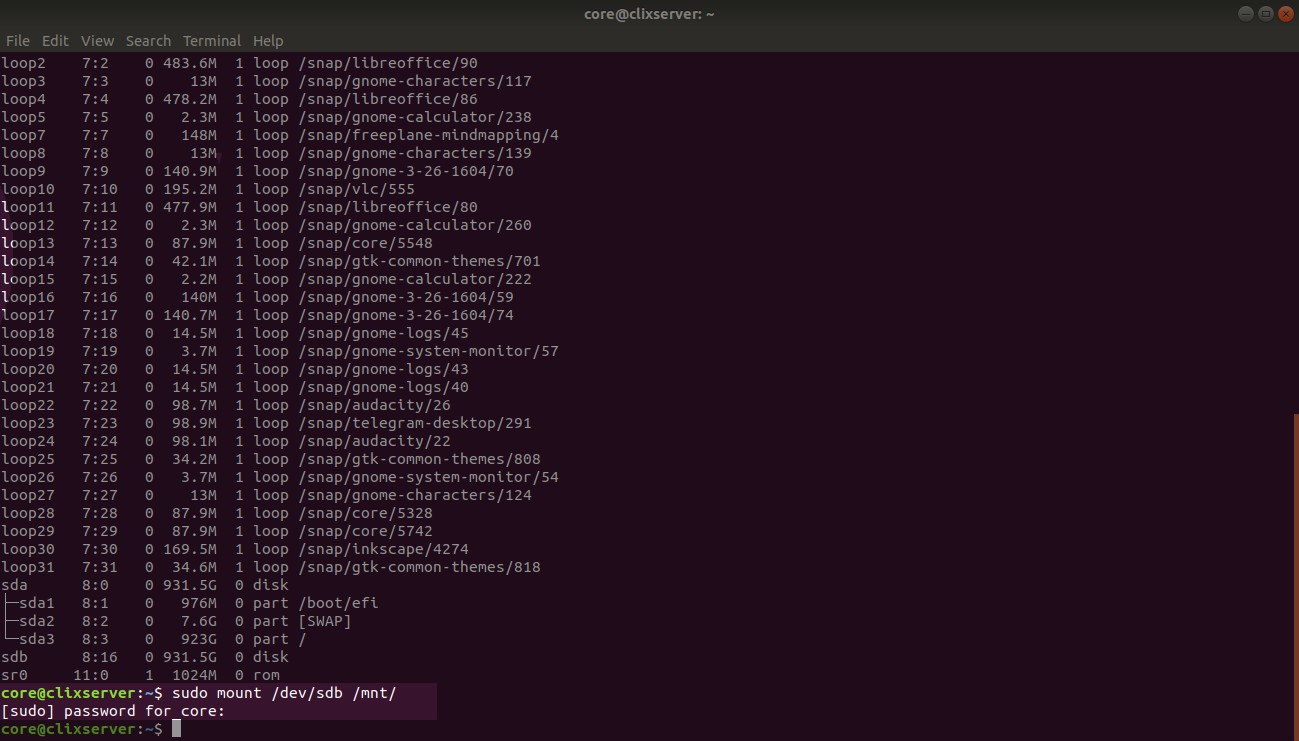
Type “lsblk” (This will list all the available block devices <internal as well as external>connected to the CPU)
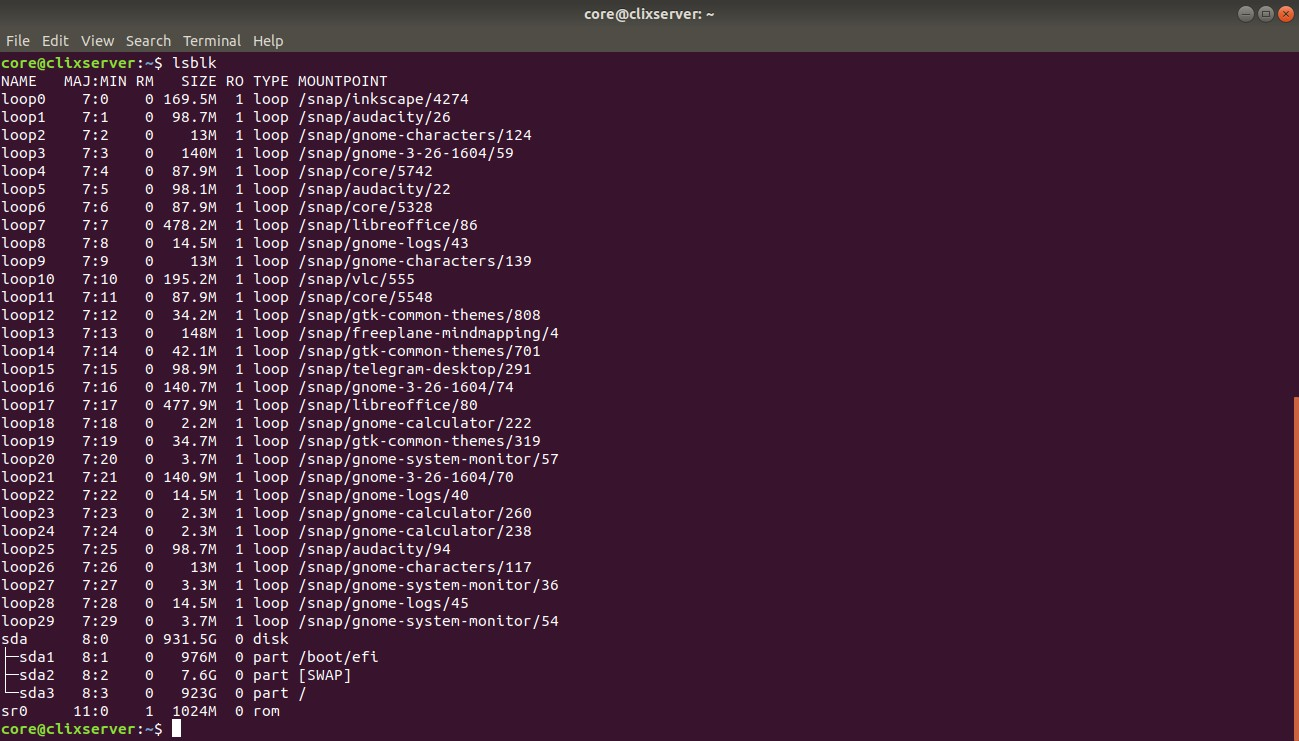
(Screen listing block devices(Hard Disks or Pen Drives))
-
Connect your hard disk on the server CPU.
-
Ensure that your Hard Disks/ Pendrive is in EXT4 format and has at least more than 10GB of free space available.
-
Type “lsblk” (This will locate the hard disk number/name/code, for eg. here it is sdb2)
(Screen showing External Hard Disk mounted on sdb)
-
Then, type “sudo mount /dev/sdb2 /mnt”.
-
After the above step, the PC will ask for the password (which can be obtained from the lab incharge)

(Screen asking for the password of the server machine)
-
After you type the password and press enter, the hard disk will be mounted to the CPU.
-
Type “lsblk” to check if the CPU has mounted the external hard disk.

(Screen Indicating sdb is mounted on /mnt )
( If it has, then under the MOUNTPOINT column, it will indicate /mnt, this means the HDD is connected).
-
You will need to copy the script file from your Installer Disk to the Server Machine. You can copy using the following command
“sudo cp /mnt/backup-complete-server-data.sh /home/core”
or you can copy paste it manually.
-
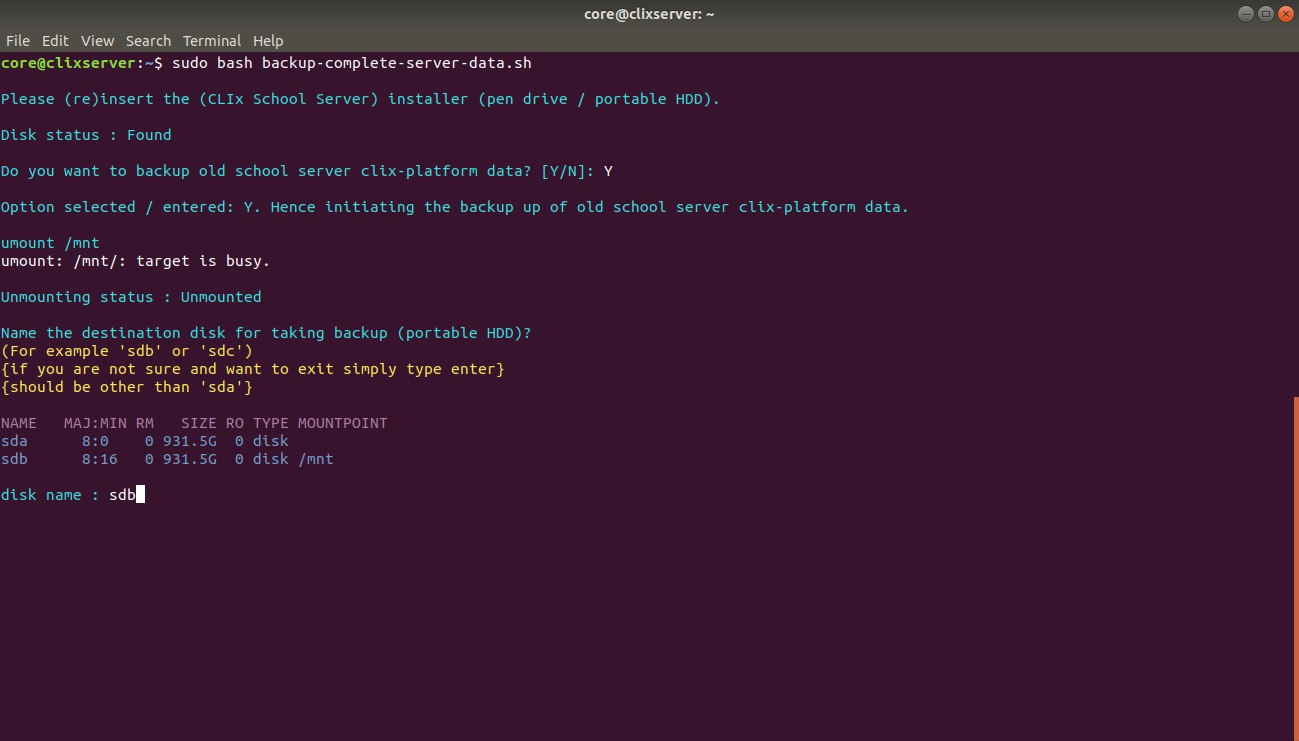
Type “sudo bash backup-complete-server-data.sh” (This command will execute the script to download data and it begins by asking two prompts).
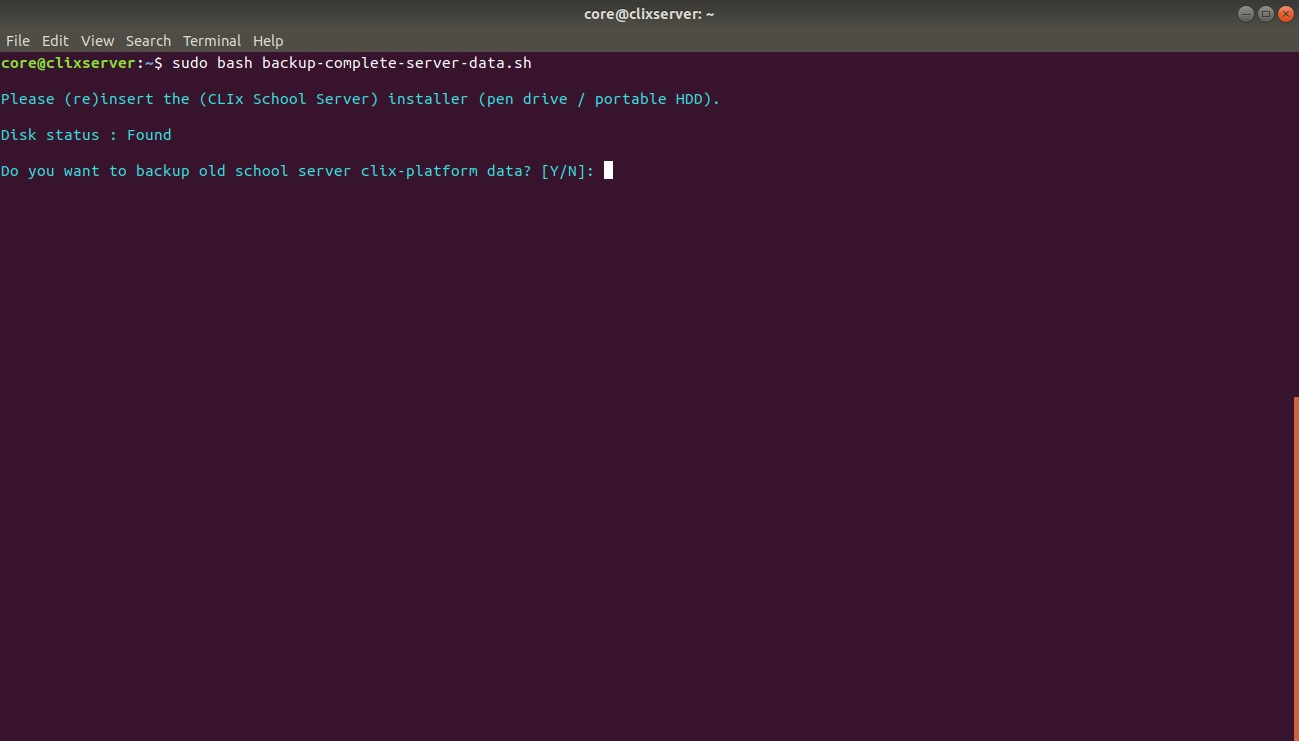
(Screen asking for Prompt Number 1, Press Y on your keyboard)
-
Type Y for prompt no.1 and press enter
-
For the second prompt, type hard disk name for eg. here it is sdb (Since Our external Disk Name is sdb, we type sdb from the keyboard)

-
Press enter (After pressing the enter, it will automatically start downloading the data)
-
Once you confirm that existing data got backed up from server machine, unmount the hard disk by using the following command (assuming partition mounted is at “/mnt”) and remove the hard disk from machine:
Command: “sudo umount /mnt”
Please note: To locate the platform data in the HARD DISK, go to
Hard Disk
--home
---core
----2018
------> TG/MZ/CT/RJ(Depending on the Server)
# Note:It is very important to identify the external HDD, so anything other than sda is an external drive. Also if you are to backup server data on an Installer Hard Disk , they have two partitions instead of one
https://drive.google.com/open?id=1PzEC9XC3Mh3OR9YW2DgCtNp3FtP-WDAH
-
Steps to Download Complete Platform Data (Pen Drives/HDD):
-
Turn the server computer ON.
-
Press ctrl+alt+T (This command will lead you to the Linux terminal).
-
Type “lsblk” (This will list all the available block devices <internal as well as external>connected to the CPU)

(Screen listing block devices(Hard Disks or Pen Drives))
-
Connect your hard disk on the server CPU
-
Ensure that your Hard Disks/ Pendrive is in EXT4 format and has at least more than 10GB of free space available.
-
Then type “lsblk” (This will locate the hard disk number/name/code, for eg. here it is sdb)

(Screen showing External Hard Disk mounted on sdb)
-
Then, type “sudo mount /dev/sdb /mnt”
-
After the above step, the PC will ask for the password (which can be obtained from the lab incharge)

(Screen asking for the password of the server machine)
-
After you type the password and press enter, the hard disk will be mounted to the CPU.
-
Type “lsblk” to check if the CPU has mounted the external hard disk.

(Screen Indicating sdb is mounted on /mnt )
( If it has, then under the MOUNTPOINT column, it will indicate /mnt, this means the HDD is connected).
-
You will need to copy the script file from your Hard Disks/Pendrive to the Server Machine. You can copy using the following command:
“sudo cp /mnt/backup-complete-server-data.sh /home/core”
or you can copy paste it manually.
-
Type “sudo bash backup-complete-server-data.sh” (This command will execute the script to download data and it begins by asking two prompts).

(Screen asking for Prompt Number 1, Press Y on your keyboard)
-
Type Y for prompt no.1 and press enter
-
For the second prompt, type hard disk name for eg. here it is sdb (Since Our external Disk Name is sdb, we type sdb from the keyboard)

-
Press enter (After pressing the enter, it will automatically start downloading the data)
-
Once you confirm that existing data got backed up from server machine, unmount the hard disk by using the following command (assuming partition mounted is at “/mnt”) and remove the hard disk from machine:
Command: “sudo umount /mnt”
Please note: To locate the platform data in the HARD DISK, go to
Hard Disk
--home
---core
----2018
------> TG/MZ/CT/RJ(Depending on the Server)
# Note:It is very important to identify the external HDD, so anything other than sda is an external drive. Also if you are to backup server data on an Installer Hard Disk , they have two partitions instead of oneHard Disk
https://drive.google.com/open?id=1awcd3UK2rR3YHj3Xkp2hOjclXd84TbUm
Steps to Download Complete Platform Data (Pen Drives/HDD)
-
Turn the server computer ON.
-
Press ctrl+alt+T (This command will lead you to the Linux terminal).
-
Type “lsblk” (This will list all the available block devices <internal as well as external>connected to the CPU)

(Screen listing block devices(Hard Disks or Pen Drives))
-
Connect your hard disk on the server CPU
-
Ensure that your Hard Disks/ Pendrive is in EXT4 format and has at least more than 10GB of free space available.
-
Then type “lsblk” (This will locate the hard disk number/name/code, for eg. here it is sdb)
(Screen showing External Hard Disk mounted on sdb)
-
Then, type “sudo mount /dev/sdb /mnt”
-
After the above step, the PC will ask for the password (which can be obtained from the lab incharge)
(Screen asking for the password of the server machine)
-
After you type the password and press enter, the hard disk will be mounted to the CPU.
-
Type “lsblk” to check if the CPU has mounted the external hard disk.

(Screen Indicating sdb is mounted on /mnt )
( If it has, then under the MOUNTPOINT column, it will indicate /mnt, this means the HDD is connected).
-
You will need to copy the script file from your Hard Disks/Pendrive to the Server Machine. You can copy using the following command:
“sudo cp /mnt/backup-complete-server-data.sh /home/core”
or you can copy paste it manually.
-
Type “sudo bash backup-complete-server-data.sh” (This command will execute the script to download data and it begins by asking two prompts).

(Screen asking for Prompt Number 1, Press Y on your keyboard)
-
Type Y for prompt no.1 and press enter
-
For the second prompt, type hard disk name for eg. here it is sdb (Since Our external Disk Name is sdb, we type sdb from the keyboard)
-
Press enter (After pressing the enter, it will automatically start downloading the data)
-
Once you confirm that existing data got backed up from server machine, unmount the hard disk by using the following command (assuming partition mounted is at “/mnt”) and remove the hard disk from a machine:
Command: “sudo umount /mnt”
Please note: To locate the platform data in the HARD DISK, go to
Hard Disk
--home
---core
----2018
------> TG/MZ/CT/RJ(Depending on the Server)
# Note:It is very important to identify the external HDD, so anything other than sda is an external drive. Also if you are to backup server data on an Installer Hard Disk, they have two partitions instead of one Hard Disk
https://drive.google.com/open?id=1awcd3UK2rR3YHj3Xkp2hOjclXd84TbUm
Data syncing process to Central server using syncthing
SoP - periodic data syncing:
We have installed CLIx platform 2018 in clix school intervention school for rollouts,there are important responsibilities that we have such as
- keeping the lab functioning
- enabling and following up with schools for rollout, supporting them
- making the overall system sustainable upto maximum possible extent.
- periodic data collection
Data collection is one of the major responsibilities of the CLIx team. For this to happen automatically (if the internet is available to CLIx school server machine) we have added a syncthing tool in the platform. The primary objective of syncthing is to enable the thin data collection through the internet from the local server's (schools) to the central server (server in TISS, Mumbai data center) without any manual intervention.
What is thin data?
Thin data consists of 5 data points/sets which are given below:
- User Progress data - Which will give us information with respect to which student has touched upon what activity in which subject.
- Assessment (qbank) data - This contains student activity outputs of the assessment
- Tools’ log data - Raw data set that is being recorded for tools enabled with activity logging functionality.
- Activity timestamp - This data set will tell us about the amount of time students are spending in each activity.
- Server machines heartbeat log
Size of the thin data: The approximate monthly data size will be between 10-100MB on an average, which depends upon the rollout frequency, intensity and student activities and artifacts that gets generated, internet availability and frequency.
Keeping CLIx server ON for activity timestamp data:
- On the 2nd and 4th Friday of every month the school authorities (either teachers or the HM) will switch on the CLIx server machine in the computer lab so that the activity timestamp data files will get accumulated in a particular location on the local server( school server) . This process happens without the availability of the internet.
- This process of activity timestamp data generation takes 3-5Hrs currently, which may go on higher side, depending upon the intensity as which rollout will happen and activities.
- The authorities should start the CLIx server machine on suggested Fridays as soon as school starts and can shut down just before closing the school. This CLIx server machine should be started and kept on the 2nd and 4th Fridays of the month even if there is no CLIx or any other lab session taking place on those days. Server machine should be kept ON and running for a minimum of 4 Hrs, beyond that is ideal (from starting till the end of the school day).
- If the Internet is made available on the same day, then the syncthing will automatically sync the generated data with the central server (TISS). If not , whenever the internet is connected to the server, the syncing of the backed up data will happen.
- Respective CLIx team members should send reminders about this, to their respective schools, before every 2nd and 4th Friday of the month.
- Please note that, for the 2nd and 4th Friday, requirement is only to keep CLIx server machine ON and not all other machines, if those are not required.
Methods of collection of Thin data
Methods of collection of Thin data :
- Through Syncthing:
-
- Schools where the internet is readily available through broadband/dongle.
- Schools where the internet is readily not available, but teachers and/or Hms of the respective schools have volunteered to set up connections (temporary or permanent) for syncthing.
- Manual Method:
Field Resource Coordinators will visit the school and manually download the thin data into their pen drives and sync it later to the central server (with the help of Field technologists, from some fixed machine and location reserver for the syncthing process).
Steps for Manual data collection:
Open clixserver.tiss.edu in browser
- Go to “Apps” section in top header
- Scroll down to the bottom and click on “CLIx Platform Data” card/icon
- Download “<schoolcode-schoolID>-syncthing.tar.gz” (eg: 4183043-tg43-syncthing.tar.tz) which contains thin data.
Steps for Syncing the data to the central server
In both the methods above, whoever visiting the school and checking the syncthing status, or collecting the data manually and syncing it through some central place like office through FTs, need to update the respective IMT entry against that particular school of which data will get synced.
Syncthing setup on CLIx server machine:
(Note: Final steps may vary and any changes will be conveyed if required, currently this setup is on hold
as central server availability provision is in process)
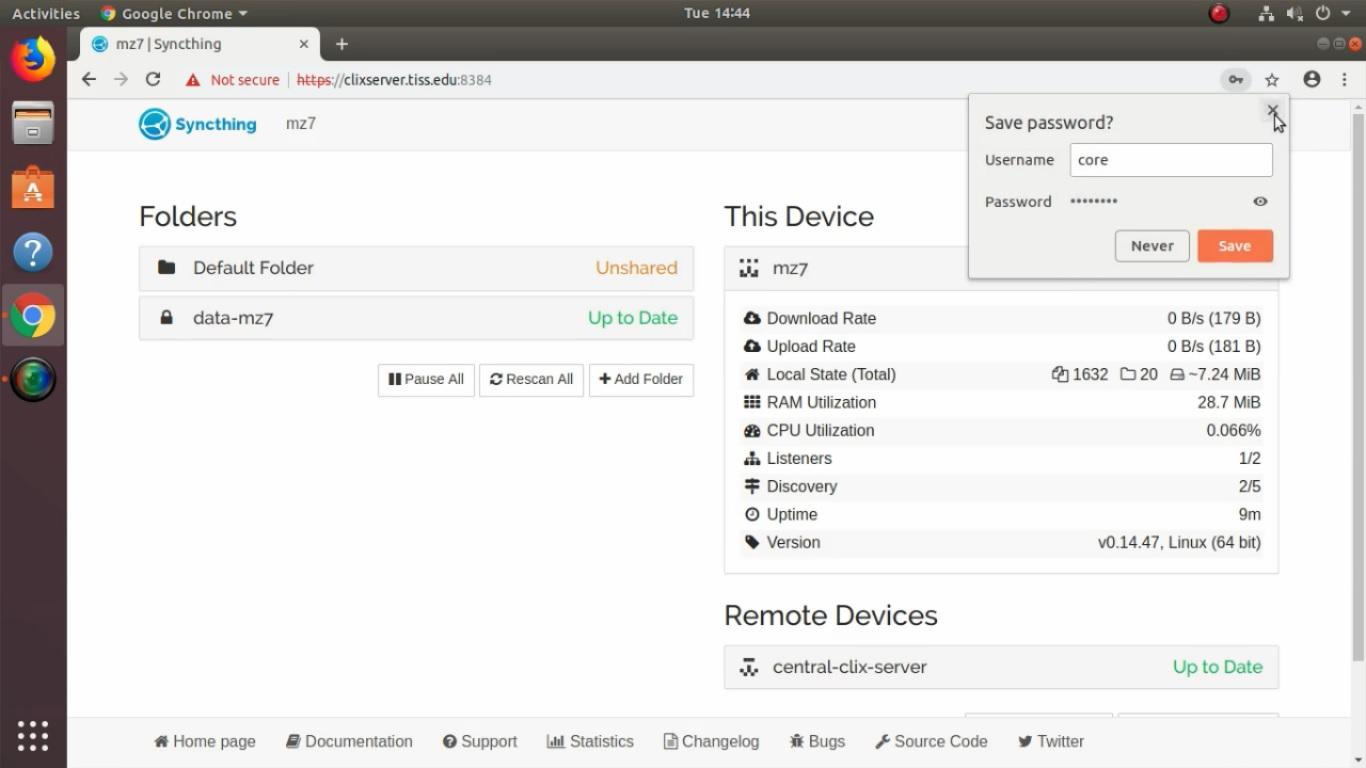
- Open the browser from CLIx server machine and enter the url as “https://clixserver.tiss.edu:8384”, click on''advanced `` and''proceed to site”
- Click on “No” for “Allow anonymous usage reporting?”
- Goto to right top corner and “Actions => Settings” and add the following values in respective fields:
3.1 In General settings:
-
-
- Device name: <school-ID>
- Minimum Free Disk Space: 10
- Anonymous Usage Reporting: Disabled
-
3.2In GUI settings:
-
-
- GUI Listen Address: 127.0.0.1:8384
- GUI Authentication User: core
- GUI Authentication Password: <school-servers-password>
-
3.3 Rest of the values remains as default
4.Click on “Add Remote Device” in Remote Device section and add the following values for respective fields:
-
- Device ID: “56 characters ID shared of “central-clix-server” shared on telegram
- Device Name: “central-clix-server”
- Address: “dynamic”
- Compression: Metadata Only
- Introducer: unselect
- Auto Accept: select
- Share folder with Device: select “data-<schoolID>” (folder name added in d.i) of the following point)
- Click on “Save”
5.Click on “Add Folder” in folder section and add the following values for respective fields:
-
- Folder Label: data-<schoolID> (eg: data-mz7)
- Folder ID: keep unchanged
- Folder Path: /backups/syncthing/
- Share With Devices: select “central-clix-server” added in step c) above
- Click on the Advanced settings:
-
-
- Rescan Intervals (s): 60
- Minimum Free Disk Space: 1
- Folder Type: Send Only
- File Pull Order: Oldest First
- File Versioning: No File Versioning
-
6. Click on “Save”
After completion of the Syncthing setup, whenever the internet gets available to the CLIx server machine in the school lab, that machine will send the data to “central-clix-server” machine. (So we should try to make provision for availability of internet for CLIx server machine in the school lab).
Steps for the Implementation team to follow
The Field Technologists will be the Point of Contact :
1 The field team will have a list of schools where the internet is available, where the range is available and where the principals will connect using their own internet connection and where the data collection will be manually done.
- The state teams will be informing all the schools ( Headmasters and teachers ) about keeping their systems on 2 & 4th Fridays of every month.
- For manual data collection, the FRCs will download the data from the platform directly.
Note that the data collection will be happening in 2 rounds( 1 st in the first fortnight of the month and 2nd in the second fortnight of the month already mentioned above )
- The FRCs will download the data into their pen drives and upload them in the designated folder.
- the Field Technologists will sync this to the central server. Only the Field Technologists will be syncing the data to the central server.
- The tech team will give (or make provision to get) weekly reports covering the following points :
- The date at which the data was downloaded
- The date at which the data was uploaded
- who uploaded the data
- which school is the data coming from
- which district
- which state
- how the data was collected (syncthing or manual syncing from the FTs)
- The research team will retrieve the data on a monthly basis to carry out their analysis
- The implementation team will use these reports to report back to the state teams regarding the number of schools the data is not coming from. FRCs Informing HM and/or Teachers (keep computers on)
Note: Along with the weekly tech reports, a common spreadsheet will be maintained by the tech-implementation- research team which will track the data coming in from the field.
** Need to finalize and attach the format of the spreadsheet that will be maintained and the format of the text reports.
https://docs.google.com/document/d/1lOxrV6yvijzRwMo4RLN3J_ouxnremRGsgSIlhZwmVXs/edit
How to check data sync progress on clixserver dashboard Syncthing
-
Turn on your school server and open Google Chrome

-
In the address bar, type “https://clixserver.tiss.edu:8384”

-
Enter username and password and click on “Sign In”
-
Username – core
-
Password – 77ck77ck

-
If you want to save username and password, click on “Save” or otherwise click “Never”
-
If there are new files, the computer will sync automatically when you connect your phone and the school server. It will show the status of syncing
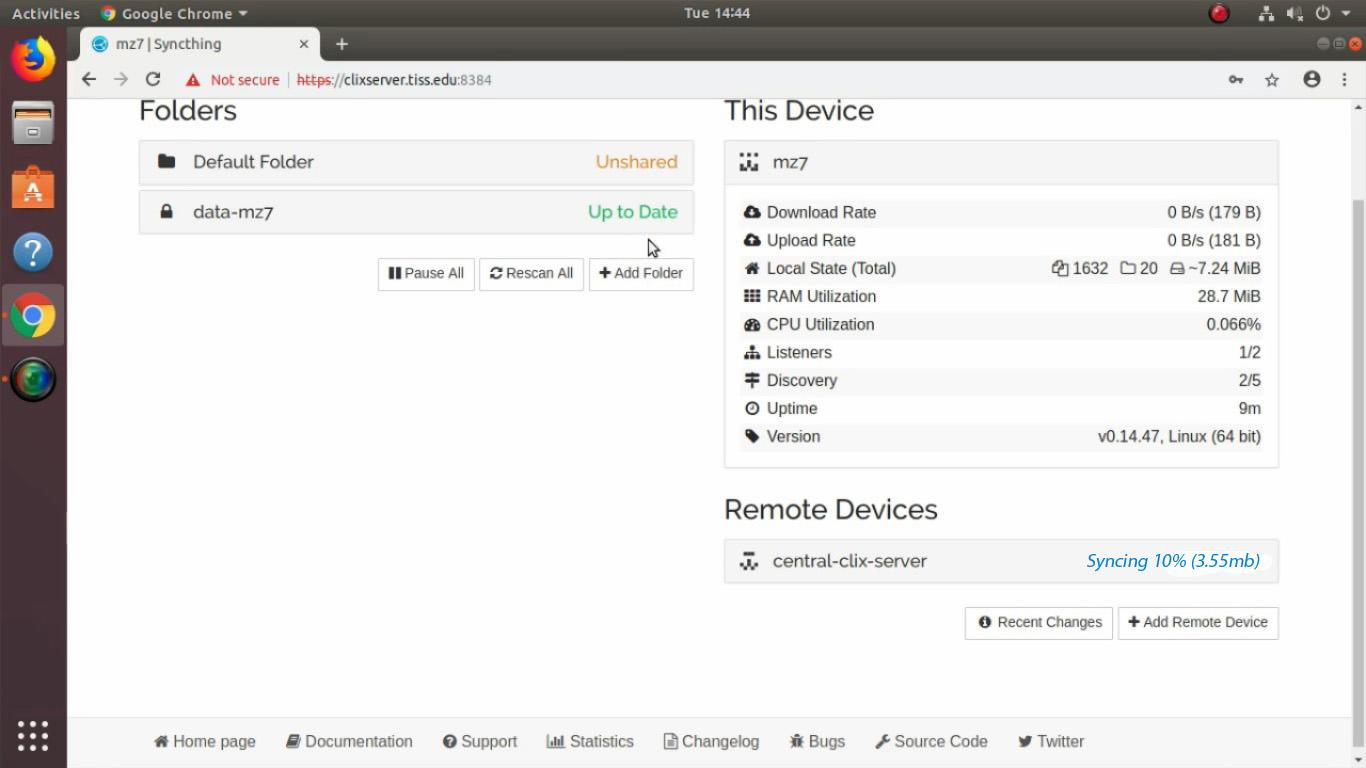
-
After the files were successfully sync, it will show Up to Date in the Remote Devices
